FlexiCore Plugins Quickstart Guide
What you'll build
You will build a classic “Hello World!” endpoint which any browser can connect to. it will showcase FlexiCore plugins’ capabilities by using a different plugin to provide the hello world string. That is, one plugin depends on another plugin and gets services from it.
The purpose of this tutorial is to show how FlexiCore modularity allows the dependency injection of plugins into other plugins
What you’ll need
A Java™ Development Kit (JDK) installed. We recommend AdoptOpenJDK version 11 or 8.
Apache Maven version 3.1 or later installed.
An Integrated Developer Environment (IDE)
Popular choices include IntelliJ IDEA, Spring Tools, Visual Studio Code, or Eclipse, and many more.
A FlexiCore based server running locally or on an accessible server.
One-click, no prerequisites installation is available for Linux (AMD64, ARM64) and Windows (AMD64) here
A Docker image with fully installed FlexiCore and prerequisites is available here
Note: at the end of this page, you can find the required instructions for running this tutorial based on IntelliJ Integrated Development Environment.
Create a new Maven Project with the following command:
mvn archetype:generate -DgroupId="org.example" -DartifactId=hello-world-service -DarchetypeArtifactId=flexicore-service-archetype -DarchetypeGroupId="com.wizzdi" -DarchetypeVersion="1.0.1" -DinteractiveMode=falseThe above command can be used in all operating systems as is. you should now make the project directory the current directory:
cd hello-world-service
Run build
mvn package
The package command should build the project.
nano pom.xml or
notepad pom.xml use your favorite text editor or notepad on Windows
make sure your pom.xml matches the one here
Assuming that your current directory is hello-world-service
with your favorite text editor on Linux
mkdir src/main/java/org/example/service
nano src/main/java/org/example/service/HelloWorldService.javaor in Windows
mkdir src\main\java\org\example\service
notepad src\main\java\org\example\service\HelloWorldService.javanow paste the code from here into the editor and save it
now build the plugin and install it into Maven local repository so dependent projects may use it.
mvn installmake sure that the install command completes successfully
change the current directory to the parent
cd ../now create a new empty project for our REST API plugin
mvn archetype:generate -DgroupId="org.example" -DartifactId=hello-world-rest -DarchetypeArtifactId=flexicore-service-archetype -DarchetypeGroupId="com.wizzdi" -DarchetypeVersion="1.0.1" -DinteractiveMode=false
cd hello-world-restnano pom.xml or
notepad pom.xml
use your favorite text editor or notepad on Windows
make sure your pom.xml matches the one here
Using your favorite text editor create a new file
mkdir src/main/java/org/example/rest
nano src/main/java/org/example/rest/HelloWorldRESTService.javaor
mkdir src\main\java\org\example\rest
notepad src\main\java\org\example\rest\HelloWorldRESTService.javaand paste the code from the bellow code snippet for HelloWorldRESTService
Notes regarding the annotations used in the code snippet above:
@UnProtectedREST
Tells FlexiCore to register this class as a JAX-RS – this is registered as an unprotected endpoint as opposed to
@ProtectedREST
When an endpoint is protected only authorized users can access it.
@Path(“plugins/helloWorld”)
tells the JAX-RS layer to register this class REST path plugins/helloWorld
@Component – tells Spring framework that this is a bean.
@Extension– Tells pf4j framework that this is a plugin.
@Tag(“HelloWorld”)– Tells Swagger API interface tagging under which tag this endpoint should be listed, our endpoint will appear under the ‘HelloWorld’ tag.
We are injecting the HelloWorldService using Spring standard @Autowired annotation, FlexiCore injects our service with a hello-world-service plugin instance.
The @GET annotation tells the JAX-RS framework that this method will activate on GET HTTP request
now build and install the plugin
mvn install
make sure that the operation is successful
/home/flexicore/pluginsand for Windows
c:\wizzdi\server\flexicore\pluginscopy each of the two plugins into the plugins folder Assuming that your current folder is hello-world-service main folder where the pom.xml is
cp target\hello-world-service-1.0.0.jar \wizzdi\server\flexicore\plugins
cp target/hello-world-service-1.0.0.jar /home/flexicore/pluginsThe hello-world-rest-1.0.0.jar plugin is dependent on hello-world-service-1.0.0.jar plugin. This is why both should be copied into the plugin folder. Now copy the other service (REST API), assuming that your current folder is hello-world-rest
cp target\hello-world-rest-1.0.0.jar \wizzdi\server\flexicore\plugins
cp target/hello-world-rest-1.0.0.jar /home/flexicore/pluginsMake sure that the plugins folder includes only one copy of each plugin, FlexiCore supports multiple versions of the same plugin, however, it requires small code modification in the plugin annotation which is beyond the scope of this tutorial
New plugins are detected by the FlexiCore server when it is restarted.
MacOS/Linux (without service installed):
note: if the server was installed by Wizzdi setup or Docker is used, FlexiCore runs as a service on both Operating Systems
java -Dloader.main=com.FlexiCore.init.FlexiCoreApplication -Dloader.path=file://home/FlexiCore/entities/ -jar /home/FlexiCore/FlexiCore-4.0.18-exec.jar
MacOS/Linux (with service installed):
service flexicore restart
tail -f /var/log/flexicore/flexicore.log
Windows:
Windows (without service installed):
java -Dloader.main=com.FlexiCore.init.FlexiCoreApplication -Dloader.path=file://wizzdi/server/FlexiCore/entities/ -jar /wizzdi/server/FlexiCore/spring/FlexiCore-4.0.18-exec.jar
Windows (with service installed):
sc stop flexicore
sc start flexicore
get-content -wait \wizzdi\server\flexicore\logs\flexicore.log

The last couple of lines here tell us that FlexiCore has started. FlexiCore’s embedded Undertow server is acting as a webserver and is listening for requests on localhost port 8080. Open your browser and in the address bar at the top enter http://localhost:8080/FlexiCore/rest/plugins/helloWorld. You should get a nice friendly response like this:

Note: if your server is installed on a different machine or as a Docker based image, replace the loclahost above with the correct ip.
Accessing the API via Swagger user interface is now possible using the following URL:
localhost:8080/FlexiCore.
The username for accessing Swagger is: admin@flexicore.com. The password can be obtained for the firstRun.txt file in
/home/flexicore
or
c:\wizzdi\server\flexicore
The steps below are detailed and can be carried out by developers new to IntelliJ.
If you are an experienced IntelliJ user, both plugins can be built in only few steps.
IntelliJ is a popular IDE for Java and can be obtained here
In this stage we will create the service plugin. The service plugin provides a single service, that is, returning a ‘hello world’ message. In IntelliJ, start a new project , select Maven
The project is created with a default pom.xml file. Update your pom.xml from here
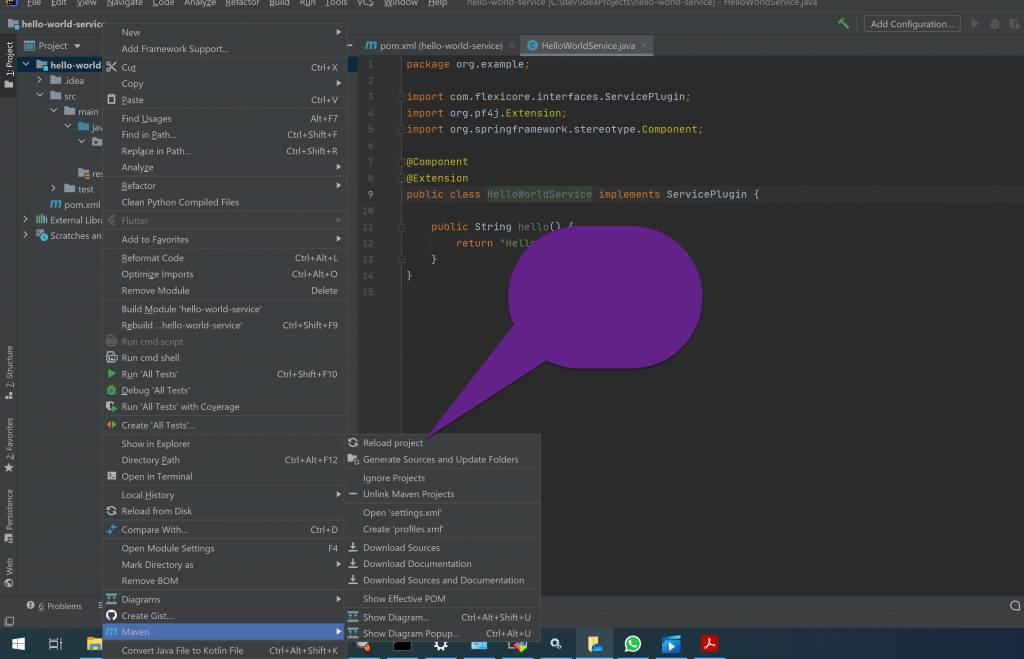
After the POM file is updated, you need to invoke reload project . This option is available on the project right click menu when selecting maven
In the Java folder created by IntelliJ add a new package: org.example
In this package create a new class named: HelloWorldService , then paste the code from here and make sure no errors are flagged by the IDE.
The hello-world-service plugin has two uses in this QuickStart context, it must be available to our REST API plugin while the latter is being build, and it should be inside the server plugins folder so the service will be available in runtime.
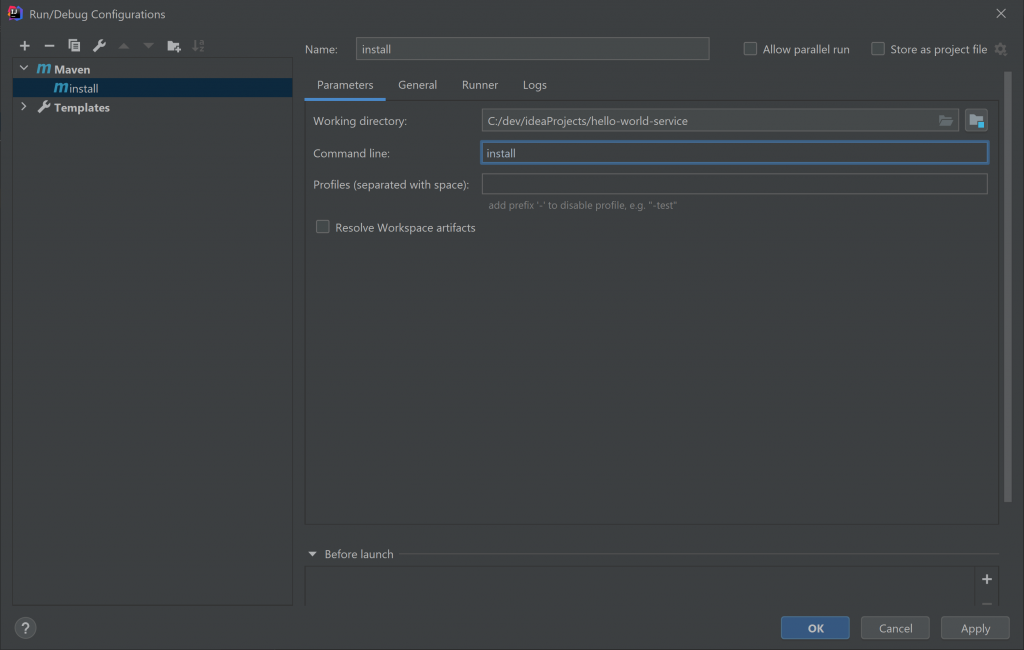
Add Maven Install configuration

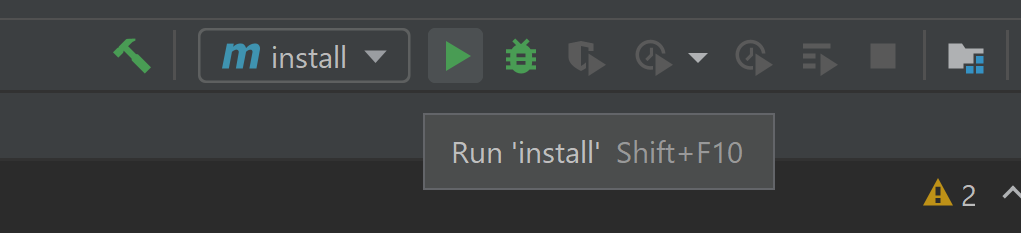
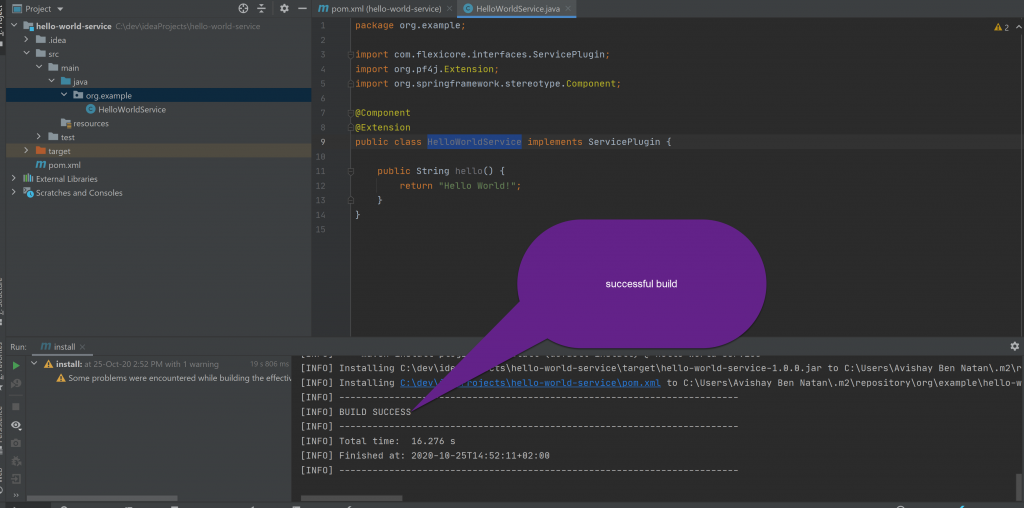
Now build the project, if successfully built, the plugin is available in the target folder and is installed in the local Maven repository.
In this stage we will create the REST API plugin. This plugin is dependent on the service plugin developed earlier.
In IntelliJ, start a new project , select Maven .
The project is created with a default pom.xml file. Update your pom.xml from here
After the POM file is updated, you need to invoke reload project . This option is available on the project right click menu when selecting maven
Click on the java folder and add a new package:org.example
Add an new java class in this package:
HelloWorldRESTService
Copy and paste the code below into the editor.
As the hello-world-rest plugin is not injected into any other plugin so no other plugin needs it as a dependency, Maven Package is used.
Now, build the plugin by clicking on the build button.
Make sure that the build is successful.

The two new plugins are available each in its project respective target folder.
these are the files:
hello-world-service-1.0.0.jar
and
hello-world-rest-1.0.0.jar
You may continue deployment as described in Step 3 above.
Success Stories